Build Your First App In Swift UI
In this course we’re going to build your first IOS app in SwiftUI. You may have come across some apps like Facebook, or YouTube, or games such as Brawl Stars or Temple Run. But do you know how are they made ?
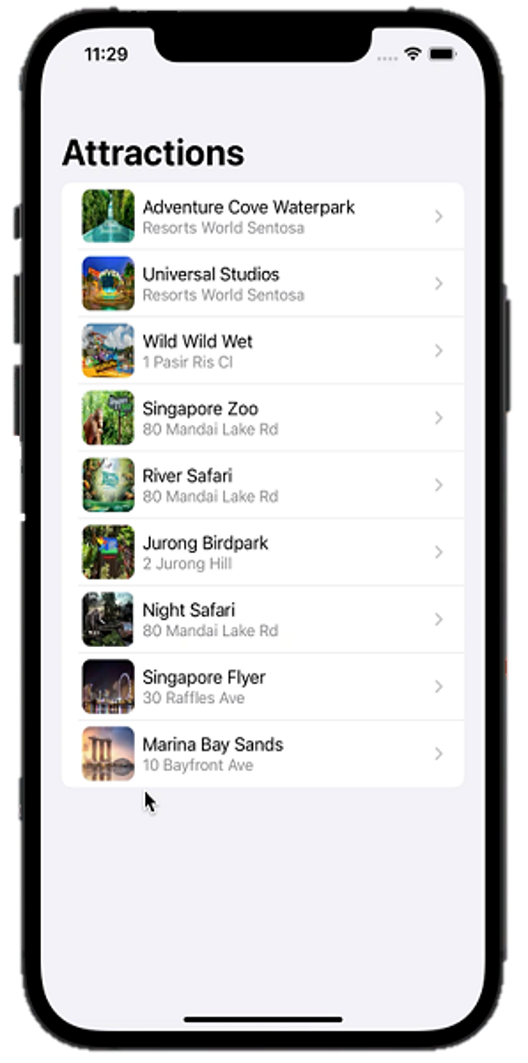
Let me do a quick demo of the app we’re building. We have a title nice and big at the top of the screen, we have a list of some major attractions in SG. It also looks good in both light mode and dark mode. In this session we’re gonna cover
- Stack Views
- Lists
- Image Loading
- Navigation Views
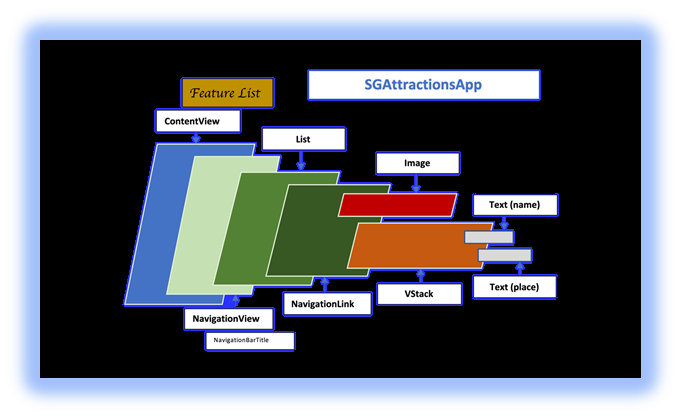
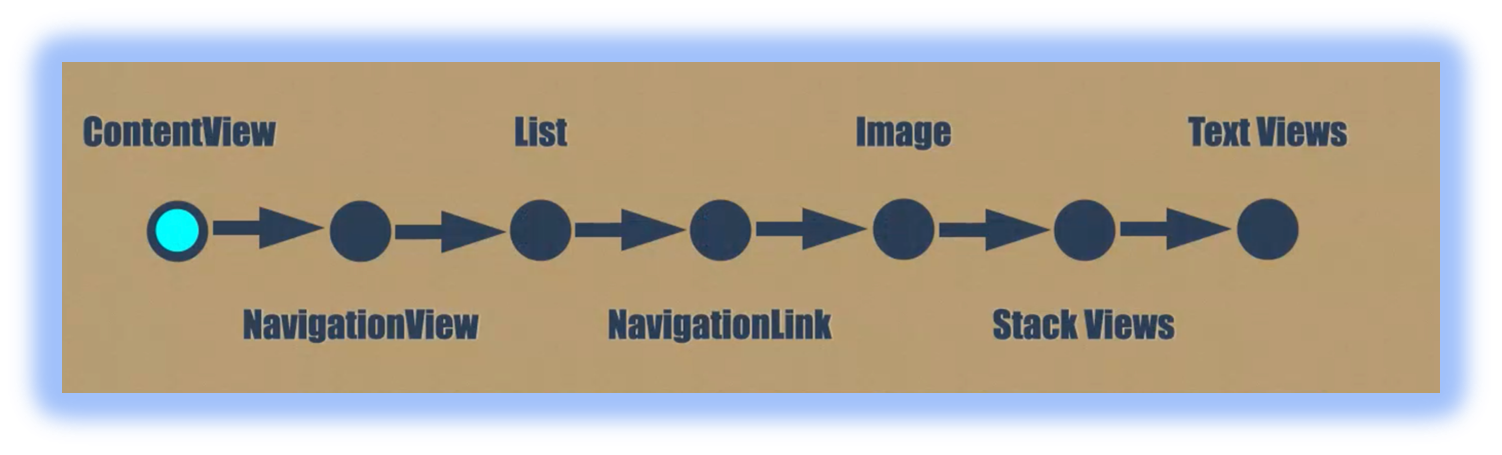
Now let me show a picture architectural representation of the app.
First Along the way I will share some tips and tricks for iOS App Development. I will assume you have XCode up and running and if you have a basic knowledge of SwiftUI, it’s an added bonus. Okay so open up XCode and create a new app. Make sure the language is set to SwiftUI and the interface is SwiftUI., let’s dive in.
First lets open ContentView and add a Vertical Stack. Vertical Stacks are views that place content one below another. In this stack let’s add some text by calling on the TextView. Now let’s pass a String called Attraction in the VStack. Then let’s add another Text element, this time address. Now command-click on the VStack and choose embed... This embeds it in an HStack which you guessed it! Stacks things horizontally. Now let’s add an image next to the VStack. We’ll add some assets in a bit but now let’s use sf symbols by adding systemname: “photo”. Sf symbol are a rich set of images provided by Apple which you can use in your app. Then set the alignment of the VStack to leading. Now let’s style the text. We add a font modifier to the address text and use the font subheadline, and a foreground color modifier to set the color to secondary. Okay! As we have our cell, lets embed it in a list. Let command click on the HStack and choose embed in list. It shows some cells in the View. It’s that easy to make a list in SwiftUI.
Now that we have this view. It’s time to add some data. let’s create a swift file. Let’s call it “Attraction”. This file will have all the data the app uses. Then we have to import SwiftUI. Now we can get started by making the structure our data will use. So, we create a struct which confirms to the Identifiable protocol. This protocol has only one requirement. Which is that it has to have an id. So let’s create a variable called id which has the value of UUID(). Now let’s create the other variables we need. We need a variable for the name of the attraction- Let’s call it name. Then we add a variable called place which stores our address and a variable called description which stores the description of the attraction. Then we create two more variables called imageName and thumbNailName which return the variable name. Then let’s make a variable called testData which is an array. Now we call the Attraction struct and define all the variables. Let me get the real data in. You can pause here for a moment and create the testData variable too.
Now let’s go to ContentView and create a new variable called attractions and pass in the value Attractions in the form of the Array we created earlier. Now we can call the array in the list and create a var called Attraction by writing Attraction in after the curly braces. Now since we have real data and images, lets pass in those. Good! But now the main view is starting to get messy. Let’s extract the VStack in a Subview and create the variable attraction which has the value of Attraction and pass in Attraction to the view. Good! Its looking great but there is a problem. The Image is too big. This has an easy fix. All we have to do is to call the resizable modifier. Now we can give it a frame which needs us to give a width and a height. Let’s give 50.0. Great! But the images look too sharp. Even this has an easy fix. We can call the cornerRadius modifier and give it a value of 8. Now it’s all good. So, let’s move on by changing the cell into a button which when clicked will take us to the next view, where we will get more detail about the attraction. To do this we have to embed our List in a NavigationView. Then we can add a navigationBarTitle which had the value of Singapore Attractions. Then we create a NavigationLink with a destination of Text(attraction.name) and move our content inside it. Great! Now let’s turn on live mode by clicking on the play button in the preview. Now when we click on it, we get a Text showing the name of the attraction. But now we need more detail in that view. So, lets create a new SwiftUI view and call it AttractionDetail. There we again create a variable called attraction which has the value of Attraction. Now we have an error because the preview is calling on the view but is not giving a value of attraction. So, we give in a value to attraction in the preview which is testData[0]. This uses the first attraction in our array of testData for the preview. So now we go to the body and add a VStack. There we add the image and use the resizable modifier. Then we add the aspectRatio modifier because we want the image to use its actual ratios. The aspectRatio has two options. Fill and fit. Fill expands the image to the whole screen. For now, let’s use fit because we want to see the whole image. Then we can add a navigationBarTitle to the view. Let’s give the value attractions.name. But we can’t see the title in the preview. This is because This view is not directly in a navigation view but is extended in the navigation view of the contentView, but our preview doesn’t know that. Since previews have all the power views have in SwiftUI, we can embed the preview in a NavigationView, and problem solved. Now we can see a good representation with the image and description of the view.
Now let’s come back to the aspectRatio modifier in the Image. We really don’t want to be stuck in .fit forever. We would like to tap on the image to change the option the modifier is using. Doing this is simple. For this we have to create a state variable. Let’s call it zoomed and set it to false by default. Now in the aspectRatio modifier change the code like shown. Then add a condition if zoomed = false { } and add the description text inside the condition. Then there is one last thing to do. Add an animation so the text goes away in an animation. Doing this is super easy ! Add an onTapGesture modifier to the view and write withAnimation { self.zoomed.toggle() }. Finally, we go to ContentView and pass in attractionDetail instead of the text. Our app is finally done let’s check it out in live mode. The List pushes and pops as expected, and our image zooms in and out with a wonderful animation to the image and text.
Let me summarize our coverage in today's learning with the help of below diagram.
Thank you for joining, in my next series I will come back with more divergent and interesting topic. I am sure it will be a great and enriching learning experience for you. Let's innovate, challenge & broaden our intellectual horizons and make it an interesting, joyous learning experience.
Till then, let's enjoy every moment ! 😀